Synchronizing Haptic Effects to an MP4 File
This tutorial is applicatble to MP4 files or any format derived from the
MPEG-4 file format including SKM and K3G. In this tutorial you will create
a complex Haptic effect to match a pre-existing MP4 file. The file that we
are using is Superman.mp4. This tutorial covers the following:
- Opening an MP4 media file.
- Opening the Sound Editor.
- Identifying the Major Features of the MP4 Media Sound and Video.
- Creating a Basis Effect for the Gun Shot Feature.
- Creating a Basis Effect for the Locomotive Sound Feature.
- Creating a Periodic Effect without a Sound Element.
- Creating a Timeline Effect.
- Creating and Modifying Launch Events within the Timeline.
- Exporting and Saving a Haptic effect.
Before Starting the Tutorial
Before starting the MP4 tutorial, you must install the 3ivx filters for
playback of MP4 files in
or the MP4 file will not open. The Media Splitter and Audio Decoder filters
from 3ivx can be purchased from the following Web site:
http://www.3ivx.com/.
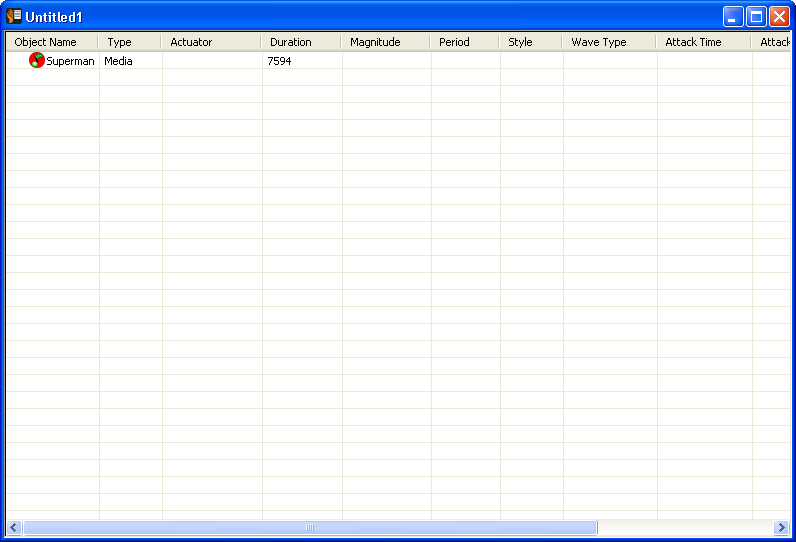
Step 1 - Opening an MP4 Media File
In ,
the first step is to open the MP4 media file.
- From the Edit menu, select New-->Multimedia. The Open File dialog box opens.
- Browse to the Audio folder. Open the Superman.mp4 file by selecting the filename and the correct file type in the Open File dialog box, and click Open.
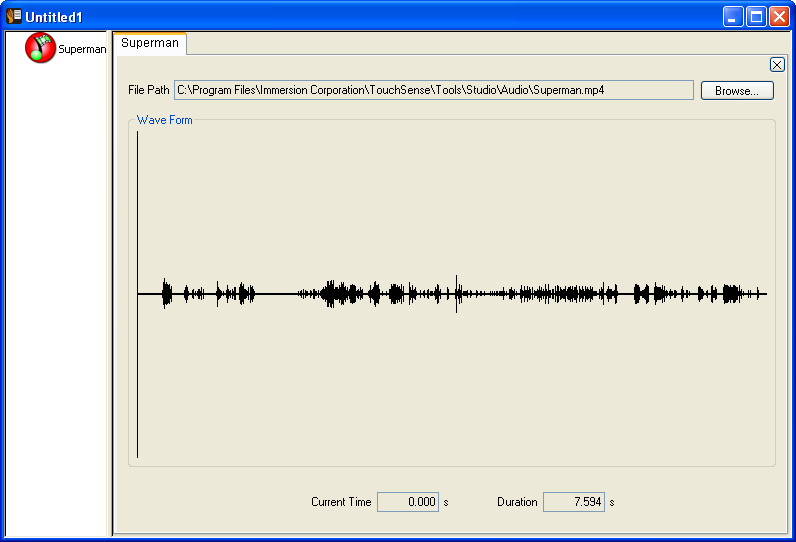
Step 2 - Opening the Sound Editor
Before you start creating Haptic effects, open the Superman.mp4 file in the Sound Editor and listen to the audio/video all the way through so you are familiar with the contents.
- To open the Sound Editor, double click the Superman.mp4 file from the List View.
- From the Toolbar, click Play to play the sound.
Step 3 - Identifying the Major Features of the MP4 Media Sound and Video
Deciding which sounds to use to create a Haptic effect can be very subjective
as different effect designers think some aspects of the sound are more important
than others. However, for the purpose of this tutorial, the sounds in the MP4
file that you are going to use to create Haptic effects are the following:
- The pop of the gun shot (loud and abrupt).
- The sustained and strong motion of the locomotive.
- Superman leaping over a tall building.
For more information on identifying the major features of an MP4 media sound
and video, refer to MP4 Tips & Tricks.
Note: The MP4 media file that you are using in this tutorial contains
visual elements of physical action without any sound, such as Superman leaping
over a tall building. You are going to add effects to these actions. Since the
Timeline does not playback video elements (only sound elements), you must use an
external MP4 player to obtain the exact timing for the effect launch event for
use within the Timeline.
Step 4 - Creating a Basis Effect for the Gun Shot Sound Feature
The first sound feature we are creating an effect for is the pop of the gun shot
after the commentator's cue. The gun shot sounds like it has three components to it.
The first two components are the initial firing and the third component is an
echo/ricochet. The first two components will be created using a MagSweep effect and
the third using a Periodic effect.
Adding a MagSweep Effect:
The first two elements should be strong vibrations with a short duration.
For this, you need to create a MagSweep effect. To create a MagSweep effect,
follow these steps:
- Select New-->MagSweep from the Edit menu and change the MagSweep effect
name to Bullet part1 by clicking on the effect once to select it, then a
second time to enter the new name.
- Type Bullet part1 for the MagSweep effect's new name and press Enter.
- Double-click the Bullet part1 effect icon to open the MagSweep Editor window.
The screen should now look like the image below.
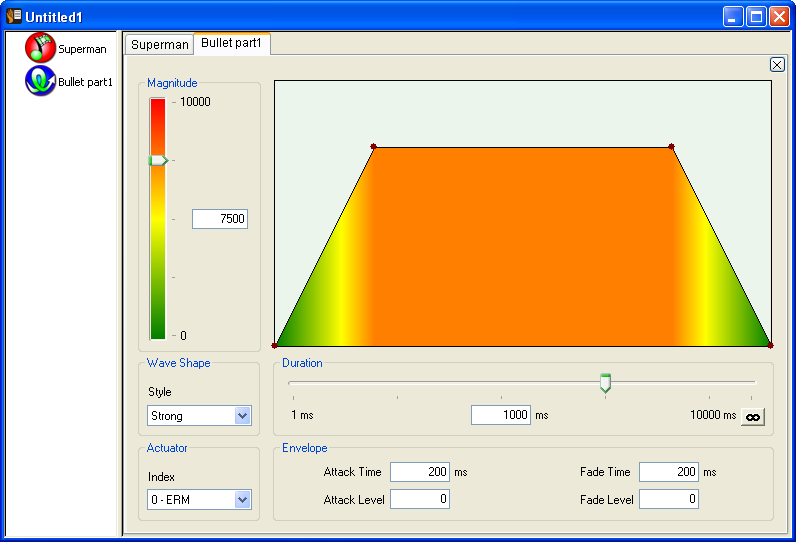
Note: Each parameter is set to its default value.
- Set the Effect Magnitude to 10,000 (the maximum setting) since the
initial pop in the MP4 file is very loud and abrupt and the matching
effect should be strong and equally abrupt.
- Since the pop does not grow or fade in time, you do not need to shape
the effect with an envelope. Set both the Attack Time and Fade Time to 0.
- The pop has two components with the first component being shorter than
the second. Set the Duration of this effect to 88 ms (if it is not found
to be accurate, you can always change this to more accurately match the
duration of the sound effect later).

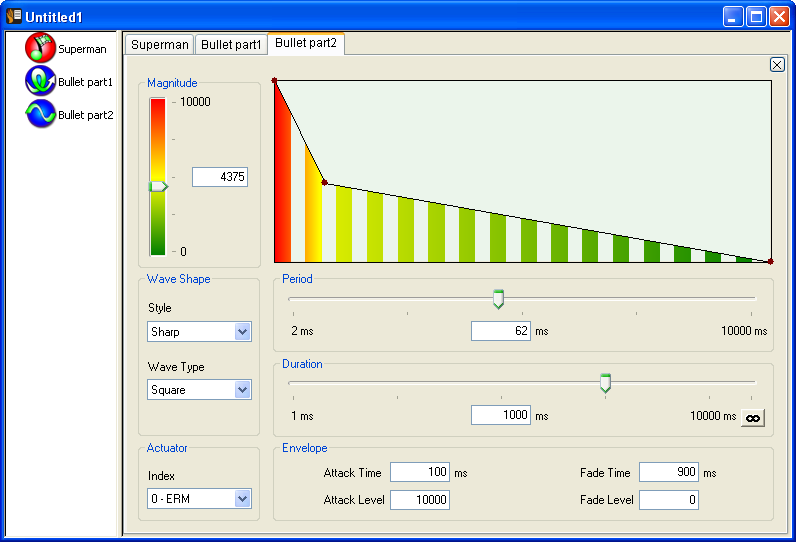
Adding a Periodic Effect:
The next sound feature you will create effect for is the third component
of the gun shot, the fading echo/ricochet. This sound requires a more subtle
and fading Periodic effect. To add a Periodic effect, follow these steps:
- Select New-->Periodic from the Edit menu rename the Periodic effect
to Bullet part2 by clicking on the effect once to select it, then a second
time to enter the new name.
- Double-click the Bullet part2 effect to open the Periodic Editor window.
You should now see a visual representation of the Periodic effect with its
default parameters. Then play the effect a couple of times to see what the
default effect feels like.
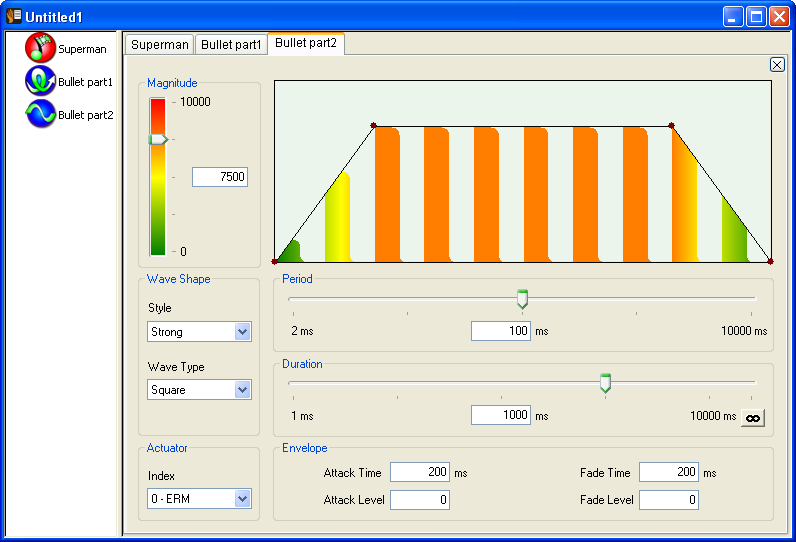
- Since the Periodic effect controls the interval between pulses of the vibration,
enter 62 ms for the Period.
- Change the Style setting to Sharp, which is suitable for low Speed effects.
- Set the Attack Time Envelope to 100 ms. This will cause it to fade over time.
- Set the Attack Level to 10,000.
- Set the overall Magnitude to 4375. This sets the effect to fade from
10,000 to 4375 over the duration of the 100ms Attack envelope.
- Set the Fade Time Envelope to 900 ms, which is the remainder of this
effect duration, and set the Fade Level to 0. Set the Duration to default (1000 ms).
This should result in a nice subtle, rumbling vibration as the effect fades off.
Note: The durations and magnitudes can always be changed later after
experiencing them in the Timeline.
Step 5 - Creating a Basis Effect for the Locomotive Sound Feature
The next sound feature you are going to create an effect for is the locomotive.
In this instance a very strong, non-fading, low speed effect is required for the
locomotive sound. A MagSweep will not give you a low speed and the Periodic effect
created previously has a distinct fade, so none of the existing effects meet the
necessary criteria. Instead you are going to create a new effect.
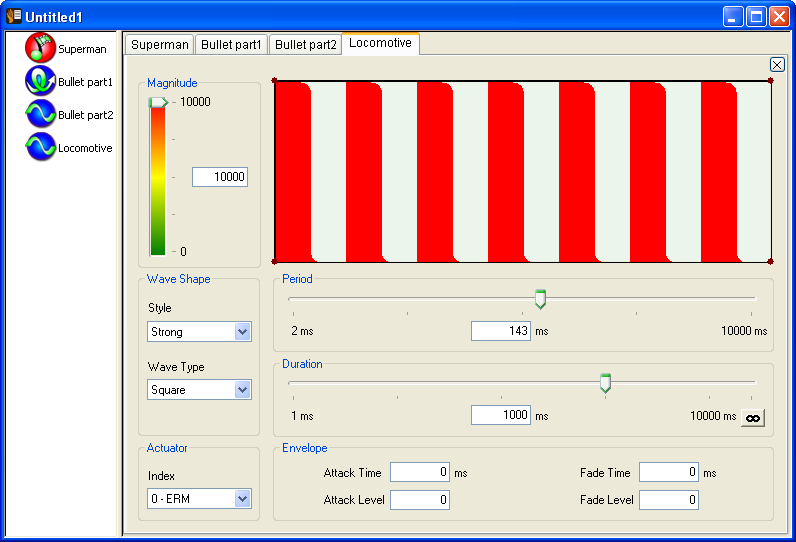
Adding a Periodic Effect:
The locomotive sound requires a sustained and strong motion; this is done by
creating a Periodic effect. To add a Periodic effect, follow these steps:
- From the Edit menu, select New-->Periodic.
- Rename this Periodic effect to Locomotive by clicking on the effect once
to select it, then a second time to enter the new name.
- Double click the Locomotive effect to open the Periodic Editor.
You should now see a visual representation of the Periodic effect with
its default parameters.
- Set the effect's Period to 143 ms and set the Magnitude to 10,000.
- Leave the Duration to the default value (1000 ms).
- Set both the Envelope Attack and Fade Time to 0. The effect's Envelopes
must be set to 0 since we do not want this effect to rise or fall in
magnitude strength.
- The Locomotive sound is repetitious, as is the effect you have just created.
Step 6 - Creating a Periodic Effect without a Sound Element
The next feature does not have a sound element to follow, only a visual of Superman
leaping over buildings. Since there is no sound element to base this effect on,
the result of the effect is left to your own artistic interpretation. For this effect,
you are going to create a slightly subtle, but dynamic effect because the action shows
Superman in the distance and there is no direct interaction with the character.
The effect will be one whose Magnitude both increases and fades over its Duration.
The increasing Magnitude represents Superman ascending the building and the fading
Magnitude represents his descent. The commentator will be used as the sound cue for
positioning this effect in the Timeline view later in the tutorial.
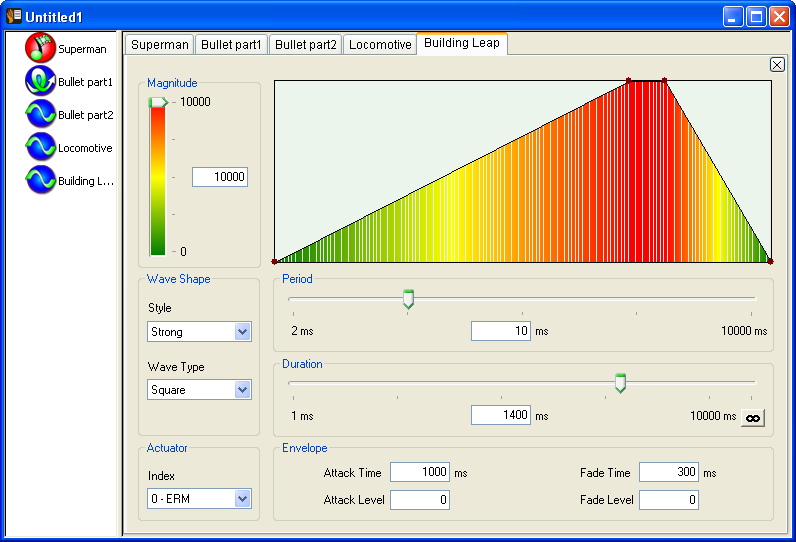
Creating a Periodic Effect:
- Create a new Periodic effect and rename it Building Leap.
- Double click the Building Leap effect to open the Periodic Editor.
You should now see a visual representation of the Periodic effect with
its default parameters.
- Next, put the Period to 10 ms (or more) so that the handset motor feels
smooth and does not feel like it is chattering.
- Now you need to review the video and estimate how long it takes Superman
to ascend and then descend the building. These estimates will be used to set
the Attack and Fade Envelopes.
Superman's ascent takes about 1000 ms and his descent takes a little over 300 ms
before the video clip ends. Allowing about 70 ms for the height of his ascent,
the effect Duration must be increased to about 1400 ms before the Envelope
durations are set. If the Magnitude is set to the maximum and then set the Attack
and Fade Envelopes with the estimated ascent and descent times, the Leaping
Building effect should look like this image.
Step 7 - Creating a Timeline Effect
Now that all the Basis Effects are designed, you must build a Timeline
so each effect can be synchronized with the MP4 media file.
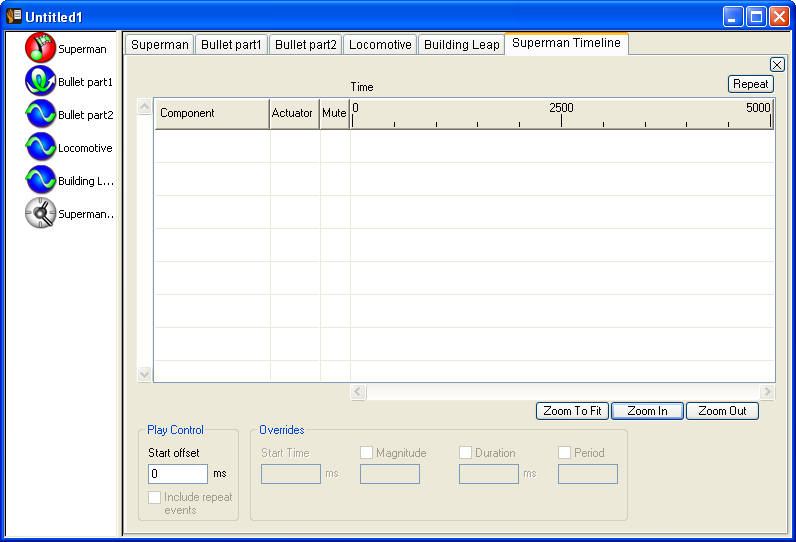
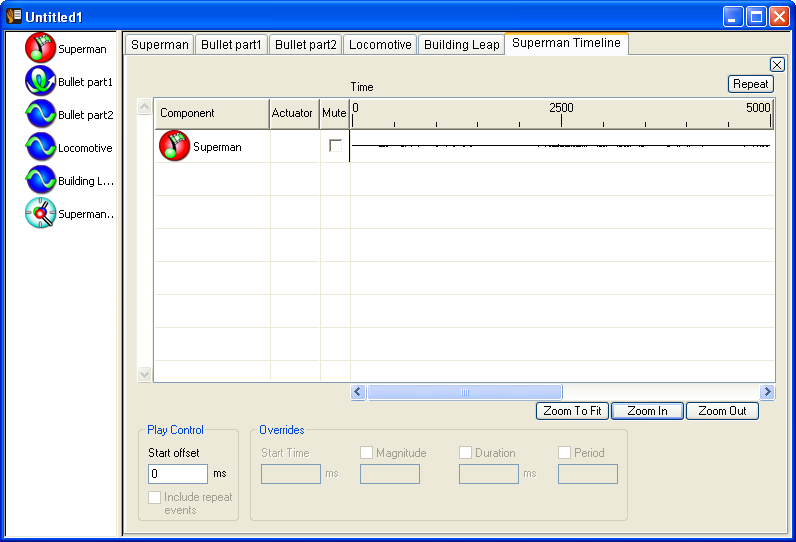
- To create a Timeline effect, select New-->Timeline from the Edit menu.
- Rename the Timeline effect to Superman Timeline, then double-click the name
to open the Timeline Editor window.
Your screen should now look like the image below. As you can see,
the Timeline is empty.
Step 8 - Creating and Modifying Effects Within the Timeline
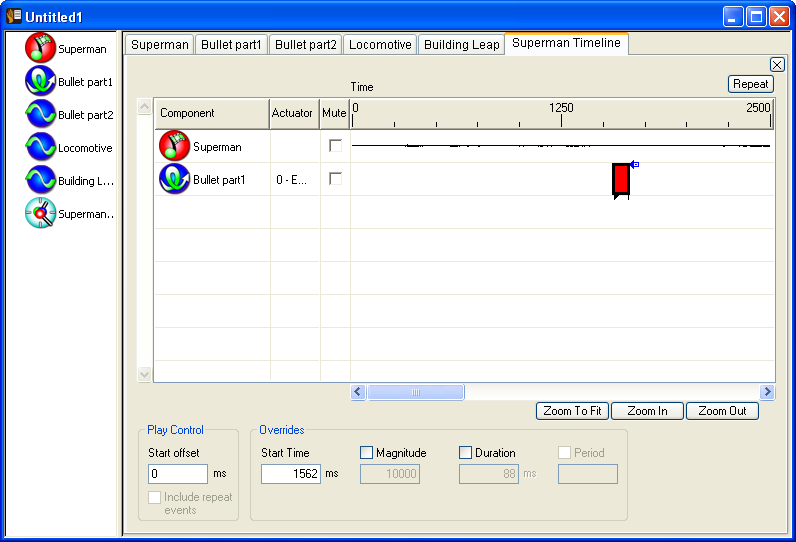
- First, add the MP4 media object to the Timeline by dragging the Superman Video
media icon from the List View on the left into the Timeline's Preview Area on the right.
- Click anywhere in the Timeline editor to activate it, then click Play.
You will see the Play Cursor move across the screen as you hear the sound play.
Adding the Bullet Effect in the Timeline:
- Add the Bullet part1 effect by dragging it into the Timeline. The effect
must play at the moment the gun shot is heard, so the Start Time must change.
To help position this effect, click the Zoom In button to see the MP4 media
form more clearly. The gun shot should begin at about 1562 ms. Click and drag
the effect instance across the Timeline for it to start at 1562 ms. Now, the
initial pop of the gun shot has two components. The second part of that pop
is stronger and louder.
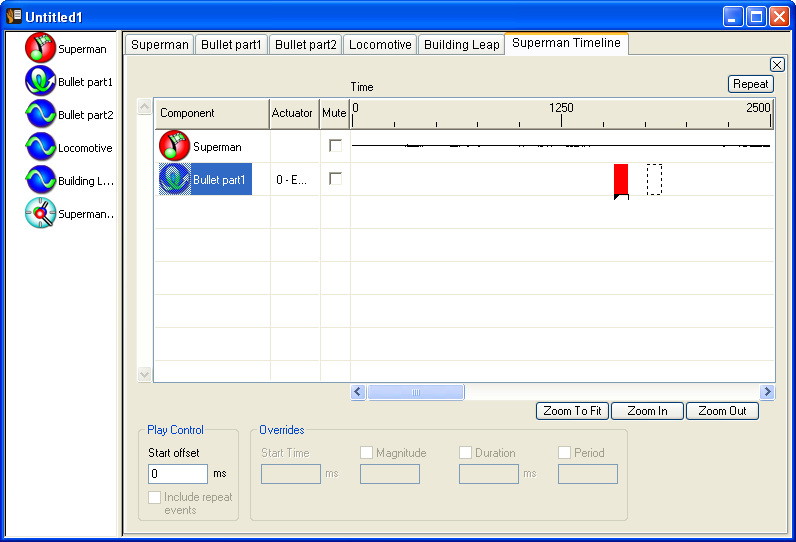
- To create another effect to the Bullet part1 effect and position it in time,
click the mouse button on the effect icon in the Timeline and drag the mouse
into the Preview Area. As you drag the mouse, you will see a dotted rectangle.
This rectangle represents the place where a new effect will be inserted
as soon as the mouse is released. Move the mouse so the dotted rectangle is near
the end of the first Bullet part1 effect and release the mouse button at a 1713 ms
start time.
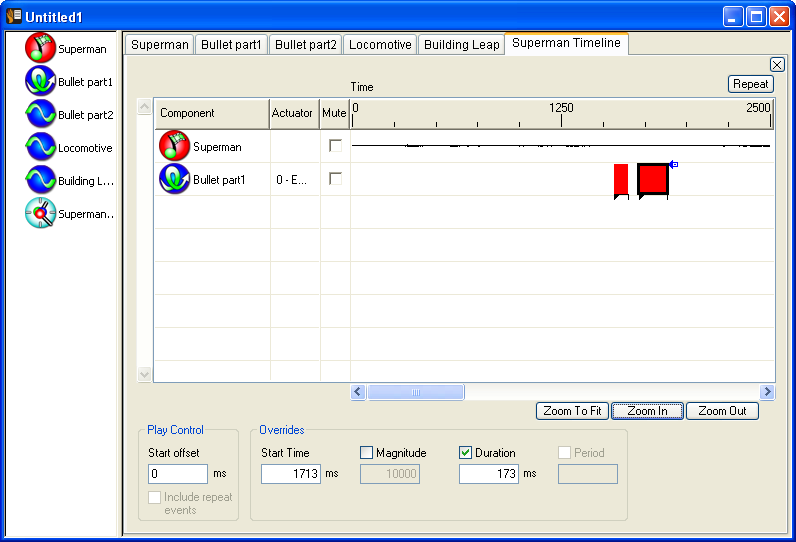
- To make this component of the gun shot feel stronger, use the Duration Override
field at the right of the Timeline window to adjust the Duration to about 173 ms.
You can also override the Duration of these Basis effects by grabbing the
right-hand side of each effect within the Timeline window.
- Add the Bullet part2 effect by clicking and dragging the icon from the List View
on the left to the Timeline View to the right.
- Change the effect's Start Time by using the mouse to drag the Bullet part2 effect
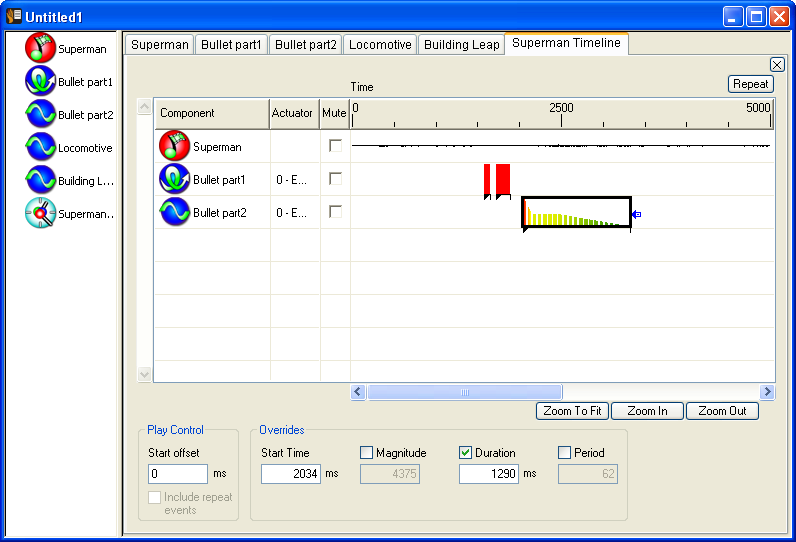
to the right to just after the pop of the gun shot for the echo/ricochet sound.
This should be at about 100 ms after the pop or at about 2034. To set the Start Time
to an exact value, use the Edit field in the Overrides area to the right of the
Preview Area.
- Now adjust the Duration of this fading effect to 1290 ms or until it suits
the duration of the fading echo/ricochet. Click Zoom Out once to see the entire
timeline again.
Adding the Locomotive Effect in the Timeline:
Now you need to add the Locomotive effect.
- Click and drag the Locomotive effect from the List View to the Timeline.
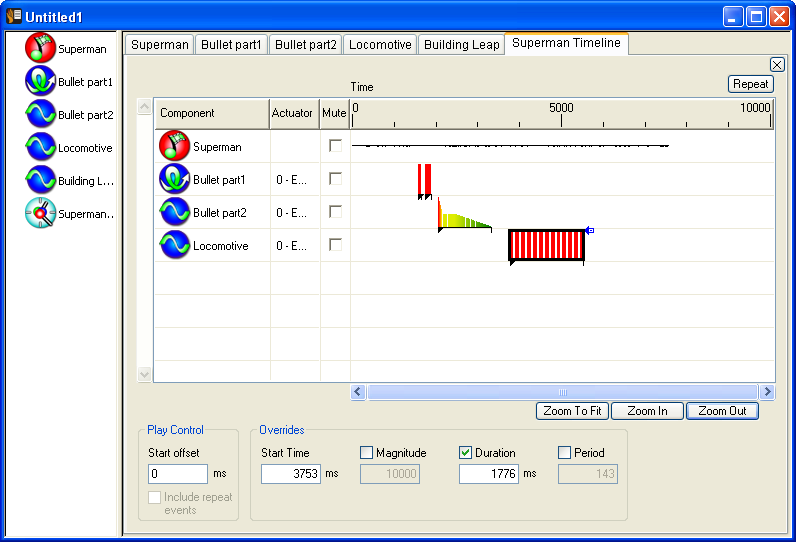
- You need to place the Locomotive effect within the Timeline to correspond with
the start time of the locomotive sound within the MP4 media element. Click the
Timeline Play button a few times and use your mouse to adjust the Locomotive effect
left or right in the Timeline as needed. Set a Start Time of about 3753.
- Next, use the Duration Overrides on the right to increase the Locomotive effect
duration to better match the Duration of the Locomotive sound, or to 1776 ms.
You can also use the mouse to drag the Duration handle (at the right edge of the
effect event) to the right to lengthen the effect. At this point, your Timeline
should look like this:
Adding the Building Leap Effect in the Timeline:
Now it is time to add the final feature.
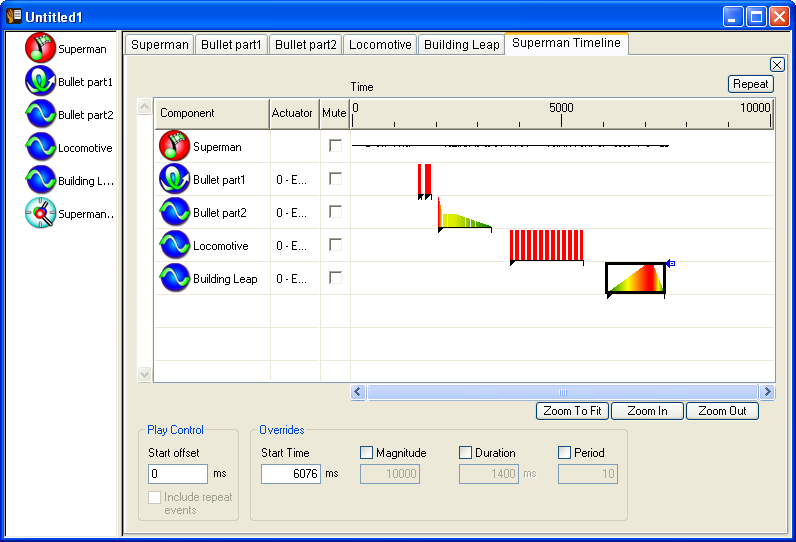
- Drag the Building Leap effect from the List View into the Timeline.
Click and drag this effect across the Timeline until it is positioned after the
Locomotive sound and the commentator's final comments. Since this last effect
is for a feature not represented by sound, you will not be able to use the
Timeline Play button to listen and fine tune the start time of this effect.
You must review the video to find the exact time Superman starts leaping off
the building and use that time for this Building Leap effect. This Start Time
should be about 6076 ms.
- Play the complete Timeline effect a few times and make any final adjustments.
For example, the duration of some effects may need to be slightly longer or shorter.
Or, maybe something feels too strong or not strong enough. In this case, you can
use the Magnitude Override to increase or decrease a particular Launch Event's strength.
Step 9 - Export and Save
You have just created your first
effect file using an MP4 media object. Next you will need to export your work
as a new MP4 file in order to embed these effects into your MP4 file.
For more information on Exporting, refer to the Export section of the online Help document.
It is recommended that you Save your data to an IVS file for editing rather than
reopening the MP4 file to edit. If changes need to be made to the file,
edit the effect by opening the original IVS file, editing the file and exporting
the file again as a new MP4 file.
If you do open your Exported MP4 file, you will notice that the individual
Basis effect names have reverted to their default names (e.g. MagSweep, Periodic,
Timeline, etc.). You may also notice that while the Timeline feels the same,
individual Basis effects with nearly identical parameters have been merged.
The Export MP4 file function strips out all unnecessary information to reduce
the final MP4 file size. For this reason we always recommend opening your original
IVS file if you need to make edits later.