Synchronizing Haptic Effects to a MIDI File

This section will take you through the process of creating a complex haptic effect to match a MIDI ringtone. This process involves several steps:

  1. Create a custom IVS reference file.
  2. Convert From a MIDI file.
  3. Select the IVS reference file.
  4. Select conversion options.
  5. Preview the effect.
  6. Convert the MIDI file.
  7. Play the new Timeline effect.
  8. Fine-tune the Launch Events in the Timeline.

Step 1 - Create a custom IVS reference file

For best results, you should create a custom IVS reference file before converting the MIDI file. This reference file only needs to be created once and can be used when converting all future MIDI files.

The reference file is a large IVS file containing one Basis Effect for each MIDI instrument. The name of these Basis Effects must be identical to the instrument names according to the General MIDI specification.

The job of the reference file is to specify default effect parameters for notes played by each instrument. The MIDI Converter will use these parameters as a starting point in the conversion process. This can be very useful because different instruments have different tonal qualities which you may want to have control over. For example, a Flute has a soft attack. That is, the beginning of a note fades in smoothly, whereas the Ride Bell starts abruptly. By hand-tweaking the reference file before the conversion process, you can give the Ride Bell effect a sharp attack as well as customize other effect properties.

comes with a default reference file (ref.ivs) which may be suitable for your needs. If you would like to make changes to it, simply make a copy of this file and change the effects as needed.

Step 2 - Convert From a MIDI file

To convert a MIDI file into a Timeline effect, use the File menu and select Convert From-->MIDI File. This will bring up an Open File dialog allowing you to choose a MIDI file. Browse to the Audio folder within the location where you installed , and open the "WeWillRockYou.mid" file.

This will bring up the MIDI File Converter dialog as shown below.

Step 3 - Select the IVs reference file

In the "Component Effect Creation" area in the lower left corner of the MIDI File Converter, you can select an IVs reference file or simply allow the converter to use default parameters. If you defined your own reference file in Step 1, select it here. Otherwise, select the reference file that is included with (ref.ivs).

Step 4 - Select conversion options

The MIDI Converter lists the channels in the MIDI file and indicates the instrument that is used in that channel. Since the percussion channel (usually channel 10) contains different instruments for each note number, it may occupy several lines in the channel list.

Beside each channel/instrument, several options are exposed. The first option is simply whether or not that channel should be converted. If this box is checked, haptic effects for the notes in the corresponding channel will be created. If it is unchecked, all MIDI events in this channel will be ignored.

Here is where a little artistry comes in. As a haptic designer, you must choose which instruments you want to generate vibrations for. Even though all instruments contribute to the music, playing vibrations for every note would lead to a constant indiscernible vibration. So, you must choose carefully which instruments to convert.

In "WeWillRockYou.mid," the rhythm is prominent and very recognizable, so it should be enhanced with vibration. Also, the Alto Sax instrument carries the melody, so you may want vibrations for it as well. The Choir Aahs enhance the music, but creating vibrations for the Aahs could detract from the rhythm and melody. So, uncheck the boxes beside Choir Aahs.

The second option tells the converter if it should use the MIDI note durations when converting the notes for that instrument. If this is checked, the Duration Override parameter of the Launch Events will reflect the duration of the corresponding MIDI note. If this is not checked, the Duration of all Launch Events for this channel will be the same as the instrument's Basis Effect defined in the reference file.

For the melody, it usually makes sense to have vibrations that last the same amount of time as each note. So, check this box for the Alto Sax. As for the Percussion sounds, leave it unchecked. This way the converter will use the effects exactly as designed for the Bass Drum and Hand Clap.

The third option instructs the converter to use the MIDI note velocity when converting the notes for that instrument. If this is checked, the Magnitude Override parameter of the Launch Events will reflect the velocity of the corresponding MIDI note. If this is not checked, the Magnitude of all Launch Events for this channel will be the same as the instrument's Basis Effect defined in the reference file.

Check this box for the Alto Sax. This will allow the converter to create vibrations of different strengths depending on how loud each note is. Again, leave this unchecked for the percussion instruments.

The fourth option instructs the converter to use the MIDI note number when importing the notes for that instrument. If this is checked, the Period Override parameter of each Launch Event will reflect the corresponding MIDI note. If this is not checked, the Period of all Launch Events for this channel will be the same as the instrument's Basis Effect defined in the reference file. Check this box for the Alto Sax only.

The final option, Period Map, allows you to specify a mapping between the MIDI note number (pitch) and the Period to use for the haptic effects. This mapping will be ignored if the "Note to Period" checkbox is not checked.

To open the Period Map, click the button in the row that corresponds to one of the instruments you are converting (in this case, the Alto Sax).

The "Edit Period Map" dialog box should appear (shown below), displaying a graph of note values (C0 to C10) across the top and haptic frequencies (Period 1000 to Period 1) on the left. The vertical blue lines represent the note numbers played by this instrument in the MIDI file. The red line-segment indicates the current mapping between note numbers and haptic vibrations.

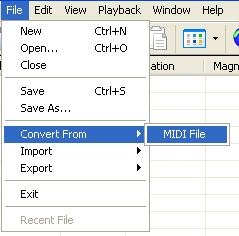
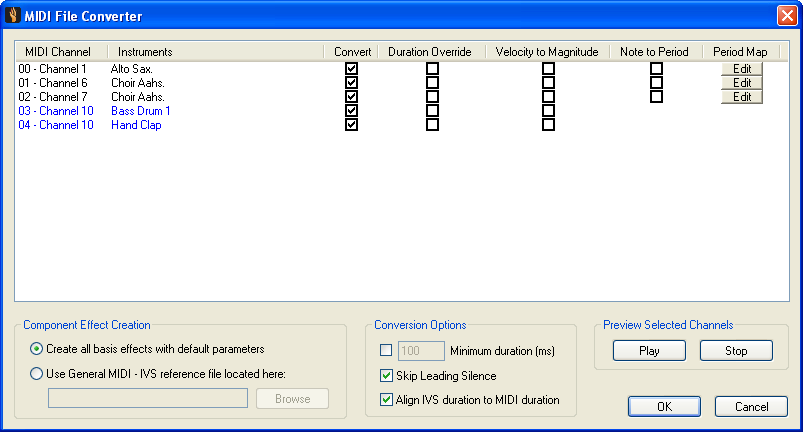
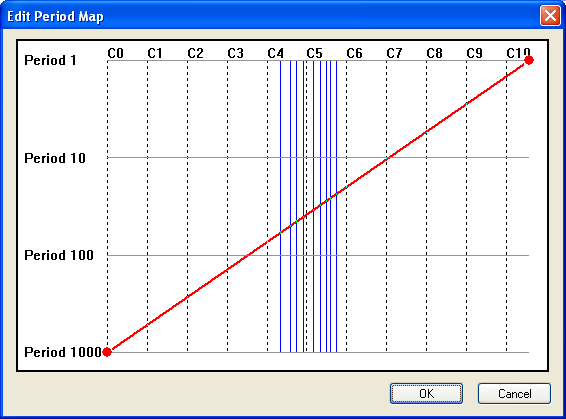
By default, the red line segment extends from the lower left corner (C0, Period 1000) to the upper right corner (C10, Period 1). This means that any notes at C0 in the MIDI file will be interpreted as a vibration with a Period of 1000 vibration, and any notes at C10 will be interpreted as a vibration with a Period of 1 in the resulting haptic effect. Notes between these two points will be scaled logarithmically as shown by the red line connecting them.

Most of the notes numbers (blue lines) are concentrated in the middle of the MIDI note range. Note that not all haptic devices are capable of reproducing a vibration with a Period of 1. Also, very slow vibrations (approaching a Period of 1000), may feel more like a series of distinct pulses rather than a vibration. So, you should change this mapping so the converter will map the pitch content of the MIDI file to the best range for Periodic effects on the device you are designing for.

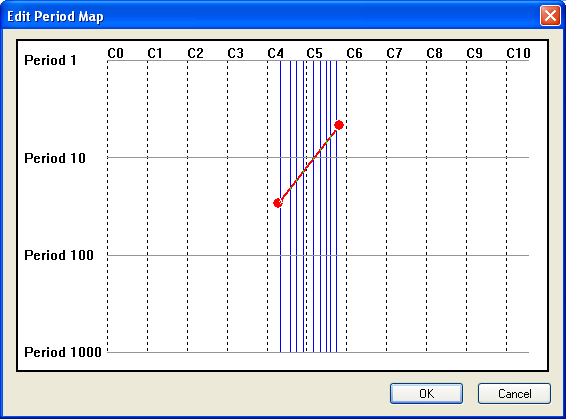
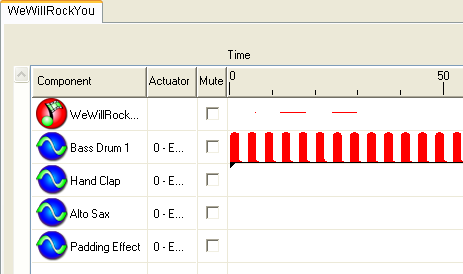
In this example set the first red control point to about (Note 52, Period 29) and the second to about (Note 70, Period 4). Your screen should now look like this:

Click the OK button to return to the MIDI File Converter dialog. With all the options set in this section, your screen should look like this:

Step 5 - Preview the effect

Before continuing the conversion process, you can preview the effect by pressing the Play button in the "Preview Selected Channels" area. When you do this, the converter will run on all channels you have selected and the resulting effect played so you will feel it while you hear the entire MIDI file play.

When converting a MIDI file for the first time, you should use this preview capability several times with different instruments selected for conversion. This will give you an idea of which instruments require vibration and which do not.

Step 6 - Convert the MIDI file

Now that you have the converter fully configured, click the OK button to finish the conversion process.

You will see a number of objects have been added to the project. There is one Basis Effect for each instrument converted, a multimedia object corresponding to the MIDI file you just opened, and a Timeline effect that is named after the MIDI file.

Step 7 - Play the new Timeline effect

Double-click the new Timeline effect to open the editor and zoom out a couple steps so you can see most of the Timeline in the window at once. Click Play to start the Timeline effect and play the MIDI file at the same time.

Step 8 - Fine-tune the Launch Events in the Timeline

The last step is to manually tweak the timeline to optimize the effect for the device you are using. This is the most artistic portion of the process, so the instructions in this section are to provide ideas.

The first thing to consider doing is removing clutter. In the previous steps, we only selected a few channels of the MIDI file for vibrations, so it shouldn't be too busy. But, if we zoom in closely, we can see that there are three or four Bass Drum notes for each beat. Since the converter adds one Launch Event for each note, we end up with three or four Launch Events for each beat in the Timeline. Some devices may handle multiple simultaneous launch events gracefully while others may not.

For the best sensations, you want as few overlapping vibrations as possible, so delete the extra launch events as shown.

This step may be a bit time-consuming, but if you remove the extra Bass Drum and Hand Clap events throughout the Timeline, you should feel a big difference in the clarity of the overall haptic effect.

You may also have noticed that the beat and the melody overlap. This can make the overall effect feel very busy or even cluttered. In the case of this MIDI file, the melody is carried by a single instrument and the beat is very basic and repetitive. So, you can get away with leaving the entire beat and melody in the Timeline. In more complex files, however, you may want to choose when you want the user to feel the beat and when the user should feel the melody. This will help you to identify more launch events to remove allowing you to impart the most important vibrations to the user.


Immersion and are trademarks of Immersion Corporation.
All other trademarks are the property of their respective owners.
© 2010 Immersion Corporation.
Visit developer.immersion.com for the latest in news and information.